Android Studio – Relearning with Udacity

This blog post will chronicle my relearning of Android Studio.

I recently applied for a contract to develop an Android application that sounds almost exactly like an app I was considering developing for a family friend! I’m still waiting to hear back after their initial email reply, so in the meantime, and regardless of whether I get the job, I’m going to relearn the ins and outs of Android studio!

I like Java, and I did really well with my XML course, so I’m actually pretty psyched to get back to developing by using these 2 languages.

This post will chronicle some of the important lessons I extract from the free course that the Android Studio people provide through Udacity. This is actually one of the best tutorials for learning a development system that I’ve ever come across, and I hope others can copy Google here (obviously this would cost them lots of money which other frameworks and systems can’t just give away, but still, I like it and I want it!).

Create Project Sunshine

  • The minSDK is the lowest SDK level the app can run on, so the lower the more users can be reached, but the less features can be extracted. It seems possible from this documentation to set a low minSDK, but then use a higher test SDK later and for production to get different features out.
  • Further to above, once your app is deployed, you should test and update your app to work on later SDKs when they are released to take advantage of new features and optimisations

Activity

  • Activity is basically a screen, but more accurately, it is a ‘single focused thing that a user can do’.
Activities are responsible for creating the window that your application uses to draw and receive events from the system.
  • So this is why every page (basically) is referred to as an activity in Android Studio. This distinction will probably be starker as you get more complex, and hence ‘page’ will not be synonymous with
  • Each activity contains layout
  • Activity layouts are stored in xml format
  • The apps resources are abstracted away from code in the ‘res’ folder to make apps transposable to different machines

Views

An Android UI class in Java, views are rectangular areas that display and receive events; they are the viewable interactive pieces – all the components the user visually sees and interacts with

  • Views come in 2 categories: UI component views & ‘container’ or ‘layout’ views.

Table 1 – Example UI View Components. Retrieved from Udacity

Class Name 

Description 

TextView

Creates text on the screen; generally non interactive text. 

EditText

Creates a text input on the screen 

ImageView

Creates an image on the screen 

Button

Creates a button on the screen

Chronometer

Create a simple timer on screen 


Table 2 – Example Container Views. Retrieved from Udacity

Class Name

Description

LinearLayout

Displays views in a single column or row.

RelativeLayout

Displays views positioned relative to each other and this view.

FrameLayout

A ViewGroup meant to contain a single child view.

ScrollView

A FrameLayout that is designed to let the user scroll through the content in the view.

ConstraintLayout

This is a newer viewgroup; it positions views in a flexible way.

Some very important attributes for layout views

  • Wrap_content will shrink the view in question to wrap the content within, i.e. it will shrink to view to be exactly large enough, and no larger, to fit what is in the view
  • Match_parent: will expand the size – or rather, width – of the view to be as large as the parent view which it is nested inside of
  • When setting precise sizes, it is typically better to use dp instead of p. dp are density independent pixels, so they are more responsive.

Container Views

  • Frame Layout – is good for simple layouts with only a single view within, such as a scrolling list that should take up the screen?
  • Linear Layout – is good for stacking views horizontally or vertically within
  • Constraint layout – more complex, suitable for more responsive designs

These were the main takeaways from lesson 1:

  • Basic layouts
  • The folder structure – layouts and UI resources are in the res folder, whilst operability is done with java in the activities folder

Penultimate Supervisor Meeting

26.10.17

Report Notes:

  • More for project plan
    • As mentioned, turn bullet points into paragraphs
  • Writing level is acceptable
  • Images:
    • Treat as figures:
      • Right click > insert > caption
    • Refer back to images by their fig number
  • Evaluation
    • Go into my Laravel experience
    • Really let out my foibles and disappointments or what went wrong
  • Conclusion
    • Like an abstract
    • Conclude the abstract

Getting a NewSimland space to upload the program

Todd has allocated some space on newsimland to upload the prototype

Details for this are in a OneNote note

UPDATE:

Successfully hooked up to it with WinSCP.

The next steps are to copy the public folder to public_html, and the rest to the root folder. Then, change the .env file to reflect the database details Todd provided.

Fingers Crossed!

Poster Evening

  • Compulsory
  • Roughly Friday 11th
    • Goes to about 5 – 6.30pm

Blog Export

  • Due next Thursday, sort of, but maybe not
  • Pay close attention to export and submission instructions

Deploying the Prototype

I’m currently trying to deploy the application to the newsimland shared server, so the client can play around with the prototype, give feedback, and demonstrate the prototype to a developer who will hopefully create a commercial version of pivot.

Deploying a Laravel application to a remote server is not necessarily difficult, but it can be, apparently especially to a shared server with multiple hosts.

Having deployed a Laravel application recently for a friend’s website, I’d already encountered and overcome many of the problems that are typical of these deployments. Here are the steps I’ve performed so far:

  • Create local and GitHub back up of the Laravel app
  • Create connection to the server at my allocated space with username and password
  • Copy the local ‘public’ folder within the Laravel app into the remote ‘public_html’ folder
  • In the .env file:
    • change the app name to ‘pivot’ from ‘Laravel’
    • set the database variables (db name, username, password)
  • In the root of the remote server, create a new folder called ‘pivot’ (after the name of the Laravel application folder)
  • Copy the local contents of the Laravel folder, apart from the ‘public’ folder, into the remote ‘pivot’ folder
  • In the remote copy of ‘index.php’ within the ‘public_html’ folder, change the __DIR__ and $app path variables to also include the folder with the non-public contents:

    From this:

    require
    __DIR__.‘/../bootstrap/autoload.php’;

    To this:

    require
    __DIR__.‘/../pivot/bootstrap/autoload.php’;


  • To migrate the database tables, enter the shell and execute ‘php artisan migrate’, and now all the database tables are created.

NB: The contents of the local Laravel application are placed in different folders like this because only the contents of the ‘public’ / ‘public_html’ folder should be accessible to the public. If all the app was technically accessible from the browser, then malicious actors could access the database directly, or perform other such actions.

Initial Results

These were the same steps I took to upload my friends website, and I didn’t experience any further problems. With PIVOT, the website is now up and accessible, but, I believe extra problems have creeped in because of the shared deployment with the unusual access URL meaning that more steps hae to be taken.

For example, the home page loads and user’s can register and login. Some pages are accessible, but also the css and javascript are a bit weird. Upon inspection, this seems to all be my local css and js that is not loading properly, and it’s because the folders are not being pointed to properly.

This also seems to be a pretty major problem with basic routing, and in particular, routing for the Models and Controllers that handle the CRUD tasks for the health diary and results. Links seems to concatenate with the current view link, making a nonsense route. One solution to this may be with the Laravel/php route() method for calling a route, but the problem here is that only a select few routes have the name property which will allow this:

  • The home link is defined by a pre-configured HomeController. Links to home (href=”/”) are redirecting to some odd newsimland.com home page. This actually makes sense because of the shared hosting nature, but I’m not sure how to point to the correct home page of this application in particular.

The body map is also having huge problems and not loading properly. It is possible to point to the correct local css and jss with the {{asset()}} method, but I’m not sure whether this is a correct fix. It also hasn’t fixed the problem because the body map assets (graphics/sprites) are not being loaded as THEY are using a path structure that is seeminly incompatible with the shared hosting structure.

It may be possible to fix all these problems with crude hacks to all the affected values, but I believe there will be a more elegant solution which is generalisable to any shared deployment solution, and so hoefullt that is what I’ll report on in the next update to this post.

Penultimate Supervisor Meeting

Report Notes:

  • More for project plan
    • As mentioned, turn bullet points into paragraphs
  • Writing level is acceptable
  • Images:
    • Treat as figures:
      • Right click > insert > caption
    • Refer back to images by their fig number
  • Evaluation
    • Go into my Laravel experience
    • Really let out my foibles and disappointments or what went wrong
  • Conclusion
    • Like an abstract
    • Conclude the abstract above
    • Don’t provide new information

Getting a NewSimland space to upload the program

Todd has allocated some space on newsimland to upload the prototype

Details for this are in a OneNote note

UPDATE:

Successfully hooked up to it with WinSCP.

The next steps are to copy the public folder to public_html, and the rest to the root folder. Then, change the .env file to reflect the database details Todd provided.

Fingers Crossed!

Poster Evening

  • Compulsory
  • Roughly Friday 11th
    • Goes to about 5 – 6.30pm
  • Class on 2nd deals with posters, and is unfortunately compulsory, so report should really be finished by Wednesday

Blog Export

  • Due next Thursday, sort of, but maybe not
  • Pay close attention to export and submission instructions

Final Features Before Submission

Intro

This post documents the implementation of some final features which will be included in the application and thus the report before the report is submitted.

Desired Features

  • Display solutions dynamically
    • Display solutions for certain body parts only (where clause)
  • Adjust user profile features
  • Display user journey with charts
  • User picks from list of solutions
    • On click, the user is provided the form to document their progress
    • This would be a “blog post” like setup for each solution

Implementation

Display Solutions Dynamically

What I’d Like to Do

Something I want to do is change up the flow of action.

  1. Users click an area of the body map that is causing trouble
  2. Taken to screen of solutions which are generated dynamically based on body part
    1. Also ordered into the ‘lights’ categories
    2. Implementing that with the existing embedded pill functions will be fun (/s), but also possibly very rewarding and cool
  3. User clicks on a solution they’d like to try and are given a pop-up form to track how they’re going with this exercise.
    1. These would need to be stored as practically blog posts
    2. Solution would be the title with entry being the body. Other details like body part and solution category would be other details posted.
  4. Would be good to have somewhere next to each solution which lets user’s know they have tried it

What I Probably Will Do

Make it so solutions are dynamically presented.

  • Could put a checkbox next to them which can be submitted and at least give user’s that knowledge of their progress.

What I Did

STORING THE SOLUTIONS

Here is a code snippet of the ‘store()’ method in the SolutionsController which is used to enter health advice into the database, which will then be output to the solutions page.


$bodypart = $request[‘bodypart’];


$light = $request[‘light’];


$problem = $request[‘problem’];


$_solution = $request[‘solution’];


$solution = new
Solution;


$solution->bodypart = $bodypart;


$solution->light = $light;


$solution->problem = $problem;


$solution->solution = $_solution;


$solution->save();


DISPLAYING THE SOLUTIONS

For now because I can’t figure out how to send a parameter to the premade ‘index()’ controller method, I’m fudging the bodypart for display purposes. BUT, this does output correctly, at least


$bodypart = “lowerback”;


$solutions = Solution::all()->where(‘bodypart’, ‘=’, $bodypart);


return
view(‘v2.pages.solutions’)->with(‘solutions’, $solutions);


The actual code snippet inside the view is even better. So now, instead of having all these solutions hard-coded in and super-annoying if I wanna mix things up, we now have this:

@if(count($solutions) > 0)

@foreach($solutions as $solution)


<div
class=“card card-outline-danger mb-3”>


<h3
class=“card-header bg-danger text-light”>{{$solution->problem}}</h3>


<p
class=“card-body”>

{{$solution->solution}}


</p>


</div>

@endforeach

@endif

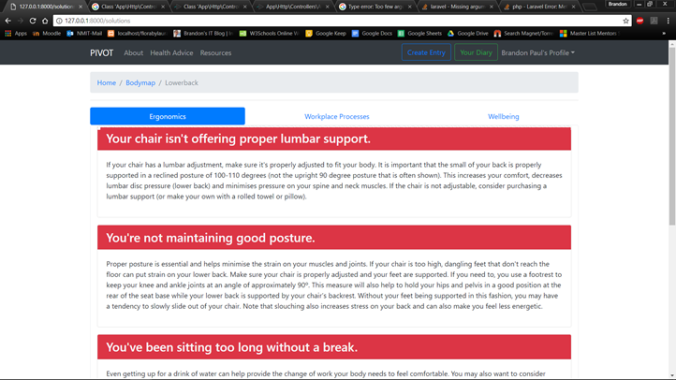
This is what is awesome about computers: they can repeat stuff really easy. So now the database records are pulled to this page and loaded dynamically:

Next Step

Next, I would perhaps like to add a bool field which will be a checkbox. Then user’s can ‘check’ when they’ve used some of the advice. The problem there is then submitting this checked state.

Route Model Binding: I don’t think this is what I’m doing here, but a forum solution provided that as the answer. IIRC, route-model binding would take care of this before hand, but this may be a bridge too far.


To Be Continued…

Supervisor Meeting – 19.10.17

This meeting was somewhat brief because of my unexpected mystery illness, but otherwise very productive.

I gave Todd a copy of my report, and it was good to get some feedback; some things I already suspected were confirmed (no personal pronouns, listing steps in processes), but more important was what I didn’t know.

Todd Advice

Project Plan

  • Extend the bullet points and describe them in brief sentences

Software Development

  • Code snippets
    • Provide code snippets to guide the reader through the process more viscerally
    • Code snippets can also perhaps provide a visual break in the report, making it easer to read
    • Both narrative flow and visual
  • Installation
    • Provide those snippets

Whole Report Structure

  • Try not to use bullet points as the main technique (which I definitely do for blog posts!)
  • Have more words 😛
  • Can potentially use personal pronouns for evaluation, but I’ll stick to the client/developer paradigm I’ve been using thus far.
  • Get rid of those numbering section headers – they’re completely out of whack
  • Create larger breaks in between important paragraph sections to provide clearer report flow (maybe even use page breaks at the end of major sections?)

Milestone 3 – First Thoughts

  • There will need to be some server-side processing. What server?
  • Previous years:
    • Database storage system: Q – named after Q from Star Trek: powerful but naughty and annoying

  • Now we might be using MQTT, BUT the MQTT port is not open on the campus network.
    • Will need to get around this somehow
    • Can test on the local machine easy enough

Check Requirements

Implement multi player game play

  • A log in
    • Validate with SESSION
      • HTTP session?
      • Remembering where a player was in the game, their game state
      • How to maintain game state when there are multiple players?
      • Do we just retain the bare minimum of data?
      • How to we retain who has what inventory?
        • My idea is to drop inventory for player’s that aren’t player 1 (Player 1 is the instigator/main character)
  • Show the location of players in the game or equivalent details in player interaction
    • Examples:
      • Chat system
      • Who is in the same scene
      • Inventory sharing
        • Can give another player an item
    • Important to have OO structure
      • Is just the command structure okay for this?    
  • Implement interaction with a sensor!!!???
    • Tilt sensor, camera, microphone
  • Documentation
    • The whole report is complete and descriptive
    • Give some description of what is happening with the milestone 3 features and how they are being achieved

Adding an accelerometer

  • Created a new project
  • Added a plane and a sphere above it
  • Added a constant force with 1 y to the sphere
  • Added the AccelerometerInput script to the sphere
  • THEN, when opening the game with the AVD, we can change the tilt of the device in the settings and the ball will move where we tilt.
  • YAY!

Blog Dump

Sorry for the apparently random ordering of blog posts. I’ve been negligent with actually posting the blogs that I’ve written, and so have posted a bunch up right now, but only realised afterwards that they were out of order by days and weeks at a time.

Laravel – Creating a Social Network

This post will detail lessons learnt in a video series on making a social network using Laravel. Of course, not every aspect of a social network site would be useful for PIVOT, but some features will most likely be useful – such as maintenance of user data and posts – and some aspects of the video will probably be indirectly useful.

Setup & Introduction

  • ‘app’ folder contains most of the business logic
  • ‘config’ folder contains authentications and general configurations
  • Don’t touch anything in the ‘vendor’ folder!
  • The css and js folders are in

Some Insights I’m Borrowing

  • Creating an ‘includes’ folder within ‘views’ folder:
    • This folder contains the sections for nav bars and possibly footers that can be inserted in pages
  • Creating a ‘layouts’ folder within ‘views’ folder:
    • This folder contains a master page which forms the skeleton for every other page (except probably error page)
  • Using the blade templating tool of Laravel to succinctly post content in a more programmatic fashion
    • The blade templating tool simplifies control structures of php (for e.g. @if … @endif), output (for e.g. {{5+5}})
    • Also brings methods for creating simple views that target classified elements.
      • For e.g. by creating a @yield(‘title’) within the master page <title> tags, this section can be defined with individual views to output the page’s title

Capturing User Health Data Form

An important aspect of PIVOT is capturing the user’s impression of their health over time. Another aspect of this is that the data should be localised to an area of the body.

The client suggested a 10 point survey to be answered. Although this would possibly capture all the aspects of the user’s health state, I informed the client that such a survey taken regularly would also lead to a “form fatigue” – meaning less use of the system – unless survey was well calibrated and/or the user saw the utility of using this.

I don’t think I’ve been successful with capturing the user’s requirements and mapping them to this solution (more on this in another post), but we were able to come to some idea of how to briefly and succinctly capture the user’s health journey.

The Basic Idea of the Form

By going back and forth with the client, these are the datum that need to be captured by the user, and some of the preferred methods for capturing the data:

  1. A slider to capture the user’s pain, e.g.:

  • This was to create a slick feeling, as well as be an obvious visual indicator.
  • Should the slider default to the last given value, middle pain value, or no pain value?


  1. A text box to capture some journaling of the user’s state.
  2. Some questions – with radio buttons or dropdowns – for the user to answer

For a production version of this program, questions and journaling would probably be specific to each body part, but as this is a demo of only 1 part, the form will be the same regardless.

How to Implement the Form?

My first stab at the simple form looks like this:

The journaling aspect is handled by a textarea, which is identified in the form by using the HTML5 attribute ‘form’.

The slider is using a bootstrap-slider library of css/js to make it look nice with the rest of the bootstrap components.

  • NB: these features, among others, will not work with Internet Explorer 10 and below (some features of the entire design using bootstrap don’t work with ANY version of IE).
  • This would be a problem that has to be addressed for a commercial application of PIVOT, because so many offices still use IE, including older versions. This is something to consider in discussion of PIVOT going forward.

Laravel Forms

Currently, this form has an action that is not tied to a database of any kind, it is just taking the user to the lowerback advice page.

When the form is submitted a Laravel specific error is genereated :

MethodNotAllowedHttpException


This error is not apparent if the method is GET, but a get method is unacceptable for a work health tracking app such as this one, so I’ll need to get to the bottom of Laravel’s form methods.

Next Steps:

  • Grapple with the Laravel form system
  • Successfully post when submitting the form
  • Create a simple database structure
  • Create a Laravel database
  • Provide a tooltip of some other way to transmit the current value of the pain slider